An RV is meant to be used and to be traveling the roads in all types of weather. A frequently-used RV is a well-loved one, so it means constant exposure to the different elements of the earth, like the sun and the rain. There are also the UV rays, hail, snow, and the wind blowing debris to your roof. This ever-changing temperature and factors can cause stains, discolorations, splits, and cracks in the roof membrane of your RV, and overtime, repairs would already be needed. These repairs can be costly so it is important to do preventive measures as early as possible.
Make your roof leak free and sealed up by using the best RV roof sealant, adding more years to your RV roof and saving you some costs in the process. For the steps below, we would be using an EPDM rubber roofing system cleaner/activator and the actual rubber roof coating system.
Table of Contents
How to Put Rubber Coating on My RV Roof?

img source: doityourselfrv.com
According to rvneed.com, these two will create a lock and key effect to tightly-bond the roofing materials. Rubber coatings are best because of their flexibility and elasticity characteristics. Make sure that before you follow these steps, you know exactly what type of material is your roof made of. This is again specific to EPDM but can also be used on TPO roofing.
Before you proceed, always take extra precautions when working on your RV roof to avoid falling as that can cause some serious injury and even death. Since you will be using two solutions for this one, the process is divided into two and the goal is to complete the whole process in a single day.
Part 1: Using the rubber roofing cleaner/activator to prepare the roof

img source: campingworld.com
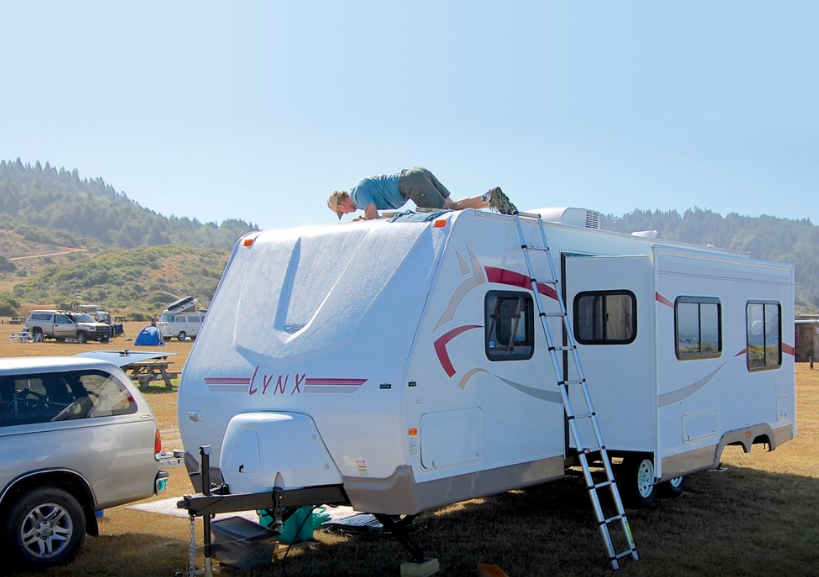
Step 1: Secure a plastic sheeting over your RV’s sidewalls, front and rear caps using tape. This step will shield your RV from all the dirt, debris, and other materials that will come from the roof.
Step 2: Remove any debris, deposits of dirt, leaves, pine needles from the roof using a vacuum cleaner. Alternately, you can also sweep it off clean using a broom or an air blower.
Step 3: Prepare the EPDM cleaner/activator. You don’t need to wash your RV’s roof before the application of the cleaner/activator. This cleaner is ready to use the material and you can apply it to the roof using an agricultural type sprayer. Make sure that you use safety goggles and latex gloves during the application.
Step 4: Spray the EPDM cleaner/activator directly to your RV’s EPDM surface even if it has residual amounts of dirt and dust. If the EPDFM cleaner is running off the roof or having an overflow, you need to adjust the spray as needed as you are using too much. As much as possible, have a uniform spray pattern.
Step 5: Let the cleaner/activator stand for a minimum of 15 minutes so it can have enough time to react to the EPDM surface.
Step 6: Rinse the entire roof surface. For best results, you can use a minimum 2000 PSI pressure washer while using a 15-inch spray pattern, you can begin the rinse from the lowest roof section, and then slowly working your way upwards while maintaining the washer tip within 12 inches of your roof. Once you’ve reached the highest point of your roof, work your way down again to do a final rinse. Should a pressure washer not handy, you can use a bristle brush instead.
Step 7: By the end of the rinsing process, the roof should be white. This is an indication that the EPDM surface has been chemically altered. Make sure that all the cleaner/activator is 100% removed before the application of the coating.
Part 2: Using the coating solution to provide a protective barrier against the natural elements

img source: trailerlife.com
Step 1: Inspect the surface of your roof and make sure that it is free from dirt and any loose particles. It should also be completely dry.
Step 2: Do any sealant touch-ups needed at least 2 weeks before doing the coating job.
Step 3: Thoroughly mix the contents of the acrylic coating for a minimum of 5 minutes before the application.
Step 4: Apply a coating on the roof’s fixtures first using a brush.
Step 5: Apply 2 coats of the rate of one gallon per 125 square foot per coat on the roof’s surface. You can use a medium nap roller with a long handle for this.
Step 6: Let the first coat dry. It should be dry to the touch.
Step 7: Apply the second coat and it should be exposed to the full sunlight for a minimum of 3 hours before nightfall. Typically, it takes 24-48 hours for the coating to be completely dried. Make sure that it will not be exposed at all to any rain or heavy dew.
Step 8: When the coat is completely dry, you can clean the equipment you used to like the sprayer with water and biodegradable detergent.
After the application, you have yourself a renewed and well-sealed EPDM roof that is good for another 10 to 12 years. You should be good for your new travels and adventures regardless if it is during the peak of the summer heat or while raining cats and dogs. Your RV’s roof is well secured and so would you.